Sunday, October 10, 2021

Log_slave_updates Mysql

  Today we will discuss about a parameter related to mysql Replication - Log_slave_updates.

This parameter is useful when configuring chain replication e.g. A-->B-->C . Here A is the master server and B is a replica of A and B further replicates to Mysql Replica C. If we don't enable this parameter on Replica B then updates coming to B will not be replicated to Replica C.

Normally, a replica does not log to its own binary log any updates that are received from a source server. Enabling this variable causes the replica to write the updates performed by its replication SQL thread to its own binary log. 

We will look at the process of updating this parameter on Replica server B:

mysql > show variables like "%log_slave%";

Variable_name             Value

---------------------        ------

log_slave_updates         OFF

Now we cannot change this parameter dynamically and changes need to made to my.cnf file followed by mysql restart. in my case the files is /etc/my.cnf.

I added the line as below and restarted mysql replica: 

log_slave_updates = ON;

Post that again checked the status of variable on the replica Server B

mysql > show variables like "%log_slave%";

Variable_name             Value

---------------------        ------

log_slave_updates         ON

Now any updates received by Replica B will be reflecting in Replica C as well.

Wednesday, November 11, 2020

Install AWS CLI on Centos

 Today we will look at installing AWS CLI on Centos, i installed on one of the EC2 instances recently and will share the steps as below:


1. Download AWS CLI:


url "https://s3.amazonaws.com/aws-cli/awscli-bundle.zip" -o "awscli-bundle.zip"


2. Once downloaded, we need to install the zip, but first need to unzip. IN my case unzip was not installed on the host , hence i have downloaded and installed as below:


yum makecache


yum install unzip


3. Once done use unzip to unpack the downloaded bundle:


unzip awscli-bundle.zip


4. Next step is to install :


./awscli-bundle/install -b ~/bin/aws


........


You can now run: /root/bin/aws --version


Refer AWS documentation as well to get further clarity on the steps/versions


Wednesday, November 4, 2020

Install mysql 8.0 on Centos 7

 Today we will look at installing mysql 8.0 on centos 7, i created a new ec2 instance having centos 7.0 and then installed mysql 8.0.

to install mysql 8.0 follow the below steps:

here i have used yum to install 8.0 edition:

1. yum localinstall https://dev.mysql.com/get/mysql80-community-release-el7-1.noarch.rpm

.............

...........

Running transaction

  Installing : mysql80-community-release-el7-1.noarch                                                                                                                                                   1/1 

  Verifying  : mysql80-community-release-el7-1.noarch                                                                                                                                                   1/1 


Installed:

  mysql80-community-release.noarch 0:el7-1                                                                                                                                                                  


Complete!


post this we need to install :


user@instance]# sudo yum install mysql-community-server

Loaded plugins: fastestmirror

Loading mirror speeds from cached hostfile

 * base: d36uatko69830t.cloudfront.net

 * extras: d36uatko69830t.cloudfront.net

 * updates: d36uatko69830t.cloudfront.net

mysql80-community                                                                                                                                                                    | 2.6 kB  00:00:00     

mysql80-community/x86_64/primary_db                                                                                                                                                  | 128 kB  00:00:00     

Resolving Dependencies

--> Running transaction check

....................

................

Installed:

  mysql-community-libs.x86_64 0:8.0.22-1.el7                      mysql-community-libs-compat.x86_64 0:8.0.22-1.el7                      mysql-community-server.x86_64 0:8.0.22-1.el7                     


Dependency Installed:

  mysql-community-client.x86_64 0:8.0.22-1.el7                     mysql-community-client-plugins.x86_64 0:8.0.22-1.el7                     mysql-community-common.x86_64 0:8.0.22-1.el7                    


Replaced:

  mariadb-libs.x86_64 1:5.5.64-1.el7                                                                                                                                                                        


Complete!


user@instance]# systemctl start mysqld


this should start mysql service


The temporary root password can be found in the mysql log file and that can be used to login to the server.


however in this version, when we login with the given root password it will ask to reset this using 'alter command'.


Thursday, October 22, 2020

Upgrading Mariadb from 10.1 to 10.3 on Centos

To upgrade Maraidb from 10.1 to 10.3 use the steps mentioned on Mariadb Website, i followed the same and was able to successfully upgrade the database without facing any issues.

I will share below, it is always recommended to go through the official documentation is detail to understand what new features are available post upgrade and what will become obsolete.

As a first step ensure to have a full DB backup before starting any activity.

1. Modify the yum repository configuration to point at install 10.3 Version:

# MariaDB 10.3 CentOS repository list

# http://downloads.mariadb.org/mariadb/repositories/

[mariadb]

name = MariaDB

baseurl = http://yum.mariadb.org/10.3/centos7-amd64

gpgkey=https://yum.mariadb.org/RPM-GPG-KEY-MariaDB

gpgcheck=1


2. Next step is to stop running mariadb Database:

 Systemctl stop Mariadb


3. Uninstall the old/existing version from the server:

yum remove mariadb mariadb-server

This should remove existing installed software, it will not remove any of the existing Data related files

4. Once above is done install the new Version of Mariadb 10.3 using yum:

yum install mariadb mariadb-server


5. After successful installation edit my.cnf/server.cnf to make any changes as per the setup

6. Start Mariadb, it should start and monitor logs for any errors

 systemctl start mariadb

7. The last step is to run mysql_upgrade command from unix prompt, this will ask for root password or a user having equivalent privileges can also be used

mysql_upgrade does two things:

  1. Ensures that the system tables in the mysql database are fully compatible with the new version.
  2. Does a very quick check of all tables and marks them as compatible with the new version of MariaDB .

At the end the output will be OK, and we are all done


Thursday, June 4, 2020

Creating MYSQL Database on AWS RDS

Today i created an MYSQL database on AWS RDS, have been thinking of doing this from quite some time and  got sometime to work on this one. RDS is  managed service from amazon , means you can create a database from AWS console , but the underlying servers/OS is managed by Amazon.

Let's check the  the process followed for the same:

Login to AWS console and click on databases:


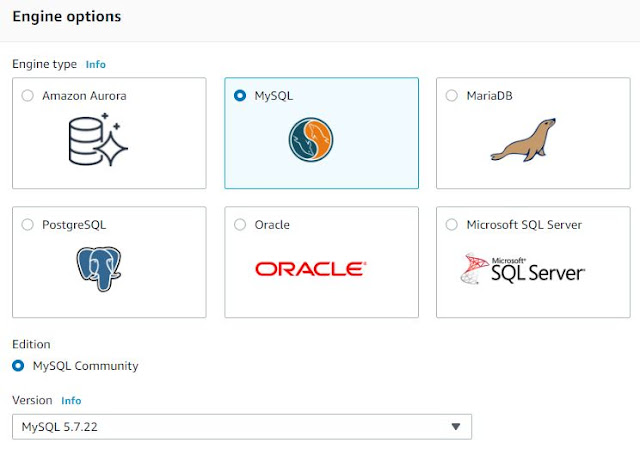
Click on Create Database and you will see many database, i chose MYSQL for my purpose


Next step is to select template, to chose if this database is for production,dev/test or free tier. based on your selection different features and pricing will be enabled accordingly


Next choose CPU, memory ,storage required 


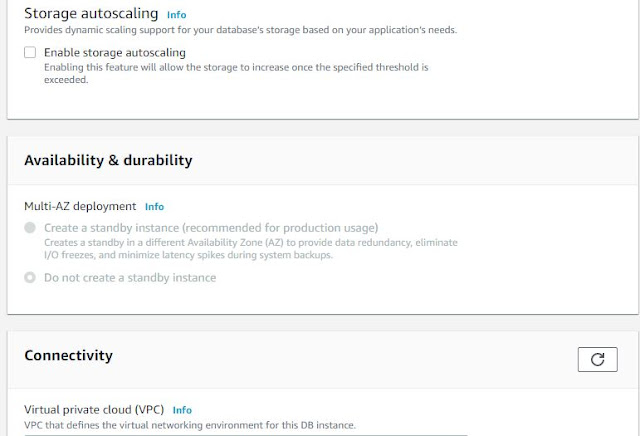
Next is to select availability and scaling if requires, since i have chosen free tier this option is disabled for me.


Next step it to choose authentication method,i chose password


while  clicking on additional configuration from above, Next steps are to set database name ,parameter group,option group , backups, retention, monitoring, logs enabling..


Once all done click create and you will see DB getting created.


This will take a few minutes and once done we can connect to RDS using endpoint given on the console:


mysql -h mysql.endpoint.rds.amazonaws.com -P 3306 -u mymasteruser -p

After that you will see a prompt like :

Welcome to the MySQL monitor. Commands end with ; or \g. Your MySQL connection id is 320 Server version: 5.7.22-log MySQL Community Server (GPL) Type 'help;' or '\h' for help. Type '\c' to clear the buffer. mysql>


And we are Done, Happy Learning as Always


Saturday, May 30, 2020

Creating SQL Server on Azure Cloud

Today i created an SQL Server Database on Azure cloud, Now a days many organisations are increasingly moving to cloud on various databases. I thought of trying SQL Server today and am still exploring all the options provided in azure for SQL server.

I captured some screenshots for the same and can outline the process:

In azure portal go to Databases and click on SQL Servers, the click create.
  
     The below screen will appear, Provide the resource group, Database Name and Server name. To create a server click on Create new and a new screen will appear 


In this screen provide server-name,username,password,location 


 You will need to check storage/compute option, do click and check how many DTU's and Disk space is required since you will be charged for the same. I chose a basic one for my testing 


Once done next page will be to validate network connectivity, i clicked on public endpoint to allow my machine to access the database (this, myip needs to be configured in firewall setting as well) 


Next step is Data source - if you want to create a blank, sample database or import from an existing one. i chose to create sample DB.


At the end click review and create and the deployment will take place, this takes a few minutes.


Once Done we can connect to your database using query editor and giving username/password that was given during DB Creation.